Showing posts with label Desserts. Show all posts

Wednesday, October 19, 2011

Paris Je t'aime! Day 3 & 4 Highlights (Or, my attempt at Ginger Pumpkin Macarons)

*With Mere away at work, I hang out at the flat waiting for our friend Christa to arrive. I find myself caught up watching (1) the Fiji v. Samoa Rugby World Cup game and (2) Le Destin de Lisa, which is like Ugly Betty, except it's German and I'm engrossed in French-dubbed version for close to 2 hours. (Seriously, it's riveting stuff.)

*The apartment manager arrives to fix the washing machine and mentions passing a blonde girl with a suitcase on the stairs. Turns out Christa's here!

(Christa's shoes, which she insists smell like puppies. I think the jetlag got to her.)

*Christa and I engage in lunch eating and people-watching. She teaches me how to ask for the check in French. Which it seems I have been doing really, really, really wrong.

*My goal for the day is to check out one of the big flea markets in the City, Les Puces in Clignancourt. Thanks to extensive directions courtesy of Jordan at Oh Happy Day, we manage to make it past the UBER-sketch vendor vans and find ourselves exploring one of the largest open-air markets I've ever seen. This place is MASSIVE. It takes several hours to explore all of it, and I'm still not convinced that we did. Both Christa and I manage to score some unique buys for home, friends, and family.

*We head back to the apartment to wait for Mere. No dice. Homegirl texts to say she's been kidnapped by her co-workers for dinner and drinks after work. (She's eventually able to escape around 2:30am.)

*Since Christa and I are on our own we decide to walk around Montmarte for dinner and drinks. Thank God Parisians like to eat late, because it's after 10pm before we manage to sit down.

*The next day we all wake up to the sound of screaming teenagers and rolling garbage bins. What the hell?


*It's apparently some kind of protest taking place at a nearby school, the Lycée Turgo. Despite Christa's investigations, we never do figure out what was going on that morning, except that the bins were stacked up against the protesters' target building. (We later discover that it has something to do with pension reform.) Christa does, however, return with a pain au chocolate for me, earning my most sincere admiration for all eternity.


*Mere is back at work with a hangover, so Christa and I are once again the Dynamic Duo for the day. Armed with the book
Parisian Chic (recommended by fellow blogger Shannon over at The Simply Luxurious Life), we decide to do some shopping. Unfortunately, there's a typo in the book and as a result we walk for friggin MILES with no luck.

*We eventually stumble upon the Hôtel de Ville...


*More importantly, we stumble upon one of the shops mentioned in my book: BHV or Bazaar de l'Hôtel de Ville, one of Paris' most iconic department stores. What is it with the French and their super-sized shopping centers? This place is at least 7 floors of merchandise. By the time we make it through 3 floors' worth of shopping, we're about to crash from low blood sugar. Time to eat!

*Lunch is followed by the one museum I'm actually geeked to check out: the Musée Rodin. It turns out that the musée costs 10€ to check out, but the jardin costs 0€. No brainer there. Besides, the jardin is home to some of Rodin's most famous pieces: 


*Part of our view of the jardin is blocked by a massive white tent. Christa and I ponder just how much you have to shell out to have your wedding amongst Rodin's artwork. We check out the museum giftshop, where I buy a pen that comes with a moving figure of  the Thinker on one end. Classy.

*The kids are still protesting, albeit more silently, in front of the Turgot.

*We, of course, couldn't care less, as Christa has a sudden hankering for macarons. We find some at a local boulangerie - a 6-pack of mini-rainbow-colored delights. Christa is semi-elated, since she's not convinced these were made in-house. Not that this stops her from generously sharing.


*It's a bust. Christa explains how a proper macaron will melt in your mouth, both crispy and creamy at the same time. The search will have to continue. But first: a nap! Followed by dinner at a lovely vegetarian bistro called Soya. I mistakenly order a carafe of rosé instead of a glass. Or did I?

And now, for your recipe......


*****************************************************
This fuss over macarons piqued my interest. I mean, how good could they really be?

Pretty f'ing amazing, as it turns out. (But more about that later.) After returning home, I decided to give making macarons a try.

Unfortunately, an online search for macarons will turn up cooking instructions that put baking these crispy treats on par with neurosurgery. Turns out macarons are temperamental little f*ckers: one misstep and you end up with cracked shells, hollow meringues and broken dreams.

Tasty broken dreams, of course, but fractured nonetheless.

I scoped out a few different bloggers and came up with an amended recipe for Pumpkin Ginger Macarons.


How did they turn out?

Meh.

They were DELICIOUS, granted, but I think I fudged the macronage stage (when you mix the dry ingredients into the whipped egg whites). There's a test you can use to see if you've under-mixed the batter, which I've included in the recipe.

Godspeed to you, fellow bakers. And as per usual, enjoy!


***************************************
Ginger-Pumpkin Macarons

(Adapted from Bravetart.com)

(NOTE: I STRONGLY suggest you check out Bravetart.com's macaron Myths and Commandments postings. They'll make you a stronger baker, promise.)

INGREDIENTS:
4 oz (115g) almond flour (Red Mill makes a decent one)
8 oz (230g) powdered sugar
5 oz egg whites (144g)
2 1/2 oz (72g) granulated sugar
1 vanilla bean, scraped, or 2 tsp vanilla extract
1/2 tsp (2g) salt
1/4 tsp (2g) pumpkin pie spice
1/4 tsp (2g) ground ginger (powdered form, please!)

a few drops of orange food coloring (optional)


DIRECTIONS:

Line 2 sheet pans with parchment paper (or with a silicone baking mat). Set aside.

Preheat the oven to 300°F/148°C. Sift the flour with the powdered sugar and set that mess aside. (You can go ahead and toss any clump or lumps that wouldn't sift.)

Place the egg whites into the bowl of your standing mixer (you can use a hand mixer here, but be prepared to do some work). Mix on medium speed for 3 minutes, until the egg whites start to look frothy. Add the granulated sugar, the scraped vanilla bean or vanilla extract, and salt. Mix on medium-high speed for another 3-4 minutes. Your egg whites should begin to form soft peaks. Add the pumpkin pie spice and the powdered ginger. Mix at high speed for another 3-4 minutes. Add the food coloring (if using) and whip for another minute. Your egg whites should form nice, shiny white peaks. Go ahead and pick up the bowl. Turn it upside down. If the egg whites stay in place, well done! If not, shower and try again.

Now here's the part where I miffed up a bit. You need to incorporate the dry ingredients into your egg whites. Sounds easy right?

Not so much. This stage, the macronage as it's been called, is where you can make or break your macarons. (Kitchen Musings has some great explanations for this.) Using a rubber spatula, fold in your dry ingredients into the egg whites (break the contents of the bowl into 2 halves to make mixing the dry ingredients a bit easier). Your goal here is to completely incorporate the flour/sugar combo. That means you need to SCRAPE THE SIDES while you're working the batter.

There's no need to sweat with panic, as there's an easy test to check if your batter is done. Every 5 - 10 stirs, spoon a little bit of the mixture onto a plate, making a small puddle of batter. If the puddle has a peak that won't dissolve, you need to keep stirring. If the peak does dissolve quickly (i.e., your batter flows like lava) then you're good to go! Check out Dulce Delight's clip on YouTube for a visual reference.

Spoon your batter into a piping bag. (No bag? No biggie! Just clip the corner off of a quart-sized ziplock bag and be sure to watch your pressure.) Pipe the batter into 1 1/2in discs on the baking sheets, keeping them approx 1-in apart. (Seriously, the batter spreads while cooking, and no one wants a double-macaron. Or DO they???) Rap the pans against the counter a few times to work out any air bubbles and them let them rest for 15 minutes or so (feel free to go longer if you like).

Place the baking sheet in the oven for 12 - 18 minutes. Why the huge time range? Well, basically ovens are like finger prints - no two are the same. (That is to say, some have hot spots while others can maintain a consistent temperature.) To accommodate for this , you'll want to check in on your macarons at the 12 minute mark. Try to pop off a meringue. It should stick a bit to the pan without separating entirely. You can also go ahead and tap one sucker in the middle. If it's super gooey, you need to cook them a bit longer. Close the oven door and check on them every 2 minutes until done. Completely cools the cookies in the pan.

The filling is considerably easier to assemble: Simply blend together 1/4 cup pumpkin puree (aka, canned pumpkin), 4 oz (or half a box) of cream cheese, 2 tbsp powdered sugar (or more to taste), and 1/4 tsp ground cloves.

Pipe or spoon a quarter-sized dollop onto a cooled macaron shell and sandwich together with an unfrosted half.

Now for the hard part: HANDS OFF. No, seriously - macarons need time to "ripen." So stick those suckers in an air-tight container and sit on your hands for a night before snacking.

Even if your first attempt is a bit of a fiasco, I promise that they'll be the best tasting mistake you've ever made. Paula Deen suggested turning failed macarons into a trifle, and that sounds like a better plan than crying over cracked cookies anyday.

Let me know if you need a tissue. Good luck!

Wednesday, February 16, 2011

Good Idea/Bad Idea?

I'm generally a little leery of food items where the phrase "stuffed with" is the highlight of the dish. I find that things can get a bit out of hand and then you're left with an excessive amount of cheese or peanut butter or something that will likely do nothing more than stain a perfectly good outfit or distend one's stomach.

There are, of course, exceptions: tacos, burritos, purses stuffed with a handful of designer accessories. I even enjoy a well made chicken roulade or Tagalong cookie.

So I'm a tad suspicious of a post shared earlier by the good folks at Serious Eats, where they introduced something at once both fascinating and slightly nauseating:

Ladies and gentlemen, may I present the Cookie-Stuffed Cookie.

Basically, you take a chocolate chip cookie and impregnate it with an Oreo. Or, in a second recipe contained in the post, you jam a Nutter Butter into a chocolate-chocolate chip cookie.
Yum?

So, I'll leave it to you to decide: Good idea or bad idea? I'll make one or the other based on feedback and then share my personal findings.

(Results from the last poll are to be posted tomorrow. You can check out the Serious Eats post about cookie-stuffed cookies here.)

Enjoy!

Tuesday, February 8, 2011

When Things Aren't What Quite What They Seem

Happy post-Superbowl (with condolences to my fellow Steeler fans out there). BHE is still sulking after the loss, but I find I can't even muster up the anger. Green Bay just plain played better.

Which sucks as I am now responsible for a bet that I made with my BFF, who - in addition to being a very excited Green Bay fan - welcomed the birth of her first child this weekend. Loser has to buy Baby Button (as in "cute as a") the winning team's gear, to be worn next season. Assuming that takes place. Looks I've got some online shopping to take care of...

Funny story: Baby Button came out with a little something extra from the womb. Namely, a penis.

Yup! My goddaughter is actually my godson, which is totally cool by me. Even if this means that I have to take back a few pink items or that his baby blanket is currently embroidered with the name "Mia Grace." I've already promised to teach him about rugby and take him out for his first tattoo, which I'm sure thrilled his mother to no end.

Baby Button, in the (tiniest) flesh.

I can already tell he's a future heart breaker. The kid has dimples for DAYS.

And now, for your recipes..................

For this post I figured I'd throw in some items that, like Baby Button, are not quite what they seem. Little tweaks and such just to change things up a bit.

Except for the creme brulee. That's just a basic. The only thing that may seem different is my thumb, which went numb from trying to work the friggin brulee torch. It was a good hour before I could manage the fine motor skills required to write a text message. Note to readers: When the recipe calls for turbinado sugar, USE TURBINADO SUGAR. I used Cook's Illustrated's recipe for this bad boy, but Alton Brown's version is equally delightful.

The brulees were part of the menu at an annual post-holiday party thrown by a group of grad school friends in the DC area. Last year I was in charge of the entrées, but this year I was put in charge of dessert. In addition to the creme brulee, I also tweaked Paula Deen's recipe to come up with a White Velvet Cake.

(Sorry - I forgot to take a photo before the starving crowds attacked it.)

How do you make a White Velvet Cake you ask? Simply head to the grocery store and promptly forget to pick up red food coloring. Piece of cake! (pun intended)

I usually shy away from Paula's recipes. (I mean how many ways can/should a person incorporate Velveeta into their dish?) But this one was serious winner. The key (I think) is the baking soda and vinegar - the resulting fizz makes the cake extra-light and fluffy.

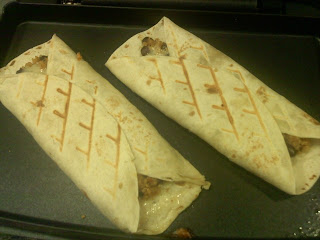
And finally, the surprise hit of the winter: my Quinoa and Black Bean Burritos!

Potential Vegan Yum!

Simply toast 1 cup quinoa in a mid-sized pot over medium high heat for a few minutes. Add 2 cups of water, bring to a boil, and then cover the pot with a lid. Turn down the head to med-low and simmer for 15 minutes. Fluff with a fork.

Meanwhile, go ahead and saute some onions/shallots and green peppers (1 each) with 1/2 tsp canola oil. Add one can of black beans (RINSED, please!) and stir to combine. Add the mixture to the finished quinoa.

Add one packet of your fav taco seasoning (or you can make some of your own) and mix to combine. You can add a bit of water, 1 tbsp at a time, if necessary.

Spoon a few tablespoons of the mixture on a flour or corn tortilla. Sprinkle with shredded cheese. Attack taco-flavored goodness like a starved wolf or pleasure delay a bit by placing the burrito in a panini press or Foreman grill for 3-5 minutes for some added texture.

As always, Enjoy!

Monday, January 31, 2011

Mondays are Fundays

Courtesy of xkcd

As I mentioned last week we had our first major snow storm of the season, which meant that I had a whole lotta time to kill during the day. So after dodging laundry and enjoying my morning cup of tea, I set up shop in the kitchen while BHE assumed his preferred napping position on the couch.

Lina also in her preferred napping position.,

Meanwhile, I decided to entertain my inner baker and whipped up some homemade Tagalongs using a recipe posted by the lovely ladies over at We Are Not Martha.

For my friends outside the U.S.: We have an equivalent to your Girl Guides, but we call them Girl Scouts. (Well, you start out as a Daisy, and then move up the ranks to Brownie, and then you become a Girl Scout, but you get the idea.) Anywho, much like your GG Biscuits, we sell a nice selection of cookies. Girls join, earn badges, go on camping trips and the like. I made it to Brownie level before losing interest, but I still support the organization during their annual cookie drive. Unfortunately, since the GS HQ decided that sending little girls off to peddle their wares by themselves was perhaps not the best idea, I often miss the cookie sale season. Which makes for a sad Adrienne.

Which is why the Martha posting that made me downright giddy. And while Samoas (aka Caramel deLites) are my favorite, Tagalongs run an extremely close second. The cookies from this recipe are AMAZING!


The recipe actually makes, like, 35 cookies. This is just what's left at my house 4 days later.

Quick notes: Be sure to use a fork or tongs when dipping, otherwise you'll burn your finger pads (lesson learned on my end). Also, like the Sues note, the recipe makes enough batter for some 60 cookies - waaaay more than the amount of peanut butter filling and chocolate dip. Unless you're catering some kind of event or just lack any concept of portion control, go ahead and halve the recipe or simply freeze half of the batter for later use.

You can find the recipe here: http://www.wearenotmartha.com/2011/01/homemade-tagalong-cookies/

We're due for another ice storm tonight, so there's a chance I'll get another day off tomorrow. Which will give me time to come up with a recipe in honor of my soon-to-arrive goddaughter. Any ideas for a starting point would be very much welcome!!

As always, ENJOY!

Monday, December 20, 2010

Shortest Blog Post Ever

I'm writing this in between pre-holiday trip errands, so rather than recap recent events, I'm just going to summary and provide recipe links where I can.

A quick visit from my younger sister prompted a breakfast run at Miss Shirley's Cafe here in Hampden. If you're a breakfast food purist, I'd suggest hitting up another establishment for your brunch. But, if you're a fan of delicious flavor - specifically in the chicken and waffles vein - then make a beeline for Miss Shirley's as soon as you have pants on.

Tony had the Benne Seed Chicken & Waffles (boneless fried chicken with honey mustard on white chedder & green onion waffles with jalapeno butter).
While I had the What Came First, The Chicken or the Egg? (which consists of a poached egg on a buttermilk buscuit with a pepper sausage and beef gravy).

Jo had eggs and hash browns. And the Savory Grits, which are made with applewood-smoked bacon and marscapone cheese. They'll put you in a food coma approximately 15minutes after ingesting.

This past weekend has been dedicated to one single-minded venture: baking. LOADS of baking. Mostly for parties but also for a few holiday gifts. Friday I managed to turn out several dozen of the Shortbread Bakery's Earl Grey Tea Chocolate Truffles. Note to would-be bakers: Do yourself a favor and invest in some non-latex gloves before rolling the truffles. You'll save a lot of time and water wasted washing your hands repeatedly.

Next, Alton Brown's Chewy Chocolate Chip Cookies. The key to this recipe is melting the butter before mixing in the sugar and using bread (instead of all-purose) flour. If you don't have a #20 ice cream scoop (I know I sure the hell don't) then simply use a 1/4 measuring cup instead.


Finally, to cap off the weekend, I turned to the good folks at Cooks Illustrated for a coconut-free, not too sweet Carrot Cake/Cupcake recipe. Unfortunately, you need a subscription to log into the site, but for $4 a month, the how-to videos alone are worth the expense.

Whew! Ok, I need to motor. I've got at least 13 hours of driving ahead of me and I need to make sure all my playlists are in order prior to my departure. I hope each of you have an AMAZING holiday and an equally kick-ass New Year!
Happy Eating!

Tuesday, December 7, 2010

The Happiest Place on Earth (if you like kimchi)

It's no secret that I grew up munching on a variety of Asian dishes. (Still do, in fact.) However, it can be difficult to find a decent Asian foods store. I mean, come on now- any corner store can carry soy sauce and long grain rice. I'm looking for something more substantial. I want some Bao, damn it!

So you can imagine my near-giddy delight when my friends Margi and Jared offered to take me to the mecca of Asian grocery chains: H Mart.

It's a little slice of heaven.
(Or Nirvana.)

H Mart is only located in a few cities in the US, so I was ecstatic when I found out that there's one located just outside of the city. The only kicker is that because it's the only one in a 50-mile radius, the place is PACKED. And for good reason: H Mart has one of the most extensive produce sections I've ever come across. Exotic fruits and veggies for days, man! There was a kimchi counter and a woman making the stuff right there in the store. I hate kimchi (I think it tastes like feet), but couldn't help but be impressed by it all.

The store carries durian fruit. I almost bought it, but I really like not throwing up at the smell of my food.

Margi handling some extra-impressive zucchini.
At least I think that's what they are
.

We spent a good amount of time trolling around the aisles, looking at this and that when I came across a box of something I'd never seen before:


A bit weird, right? Turns out these tribble-looking beauties are a type of friut called rambutan. I have never encountered these before (I thought they might be lychee at first), but a woman behind us went all kinds of nostalgic at the sight of them and described how you pick, prepare, and eat them when you want a sweet snack. (Apparently, you cut off the spikey husk and eat the flesh inside.)

I picked up two to try later.


This photo makes my husband giggle every time.

Unfortunately, the rambutan got lost in the shuffle of holiday leftovers, and I wasn't able to get to them in time.

After I spent a good 10minutes making a selection from a wall of soy sauce options, my ride and I picked up some frozen odds and ends and then made it back to the city. I was in Hello Panda heaven the entire trip home.

And now, for your recipe.......

A while ago I decided to use up the last of some farmer's market apples with a recipe I had come across on the Darjeeling Dreams site: Skillet Apple Cake.

It's very easy to make, though I feel the cake part could be a little more moist. However, the dryness in my attempt may be due to the size of my skillet. I suspect the portions in the DD's recipe are intended for an 8-in skillet. Mine is 12in. Next time, I think I'll double the batter.
You can check out the recipe by checking out Darjeeling's site here.
Winter has officially come to Baltimore after sneaking in the back door, so this week it's all about warm foods, spiked cocoa, and stockinged feet. Possibly some crochet projects. In the meantime, I suggest you buckle down, catch up on past episodes of The Walking Dead if you've haven't yet, and then enjoy the musical stylings of Adele's latest single, Rolling in the Deep.
Enjoy!

Monday, June 21, 2010

Dark & Stormy Cupcakes: Vegan Version 2.0

Happy Summer Solstice, people! And happy belated Father's Day to all you dads and dads-to-be out there. Here in our little corner of the city, I decided to take a stab at some vegan baking to commemorate another great event: our friend Meredith's birthday.

Meredith, bless her, has been abstaining from both alcohol and baked goods this month, so I decided to let her indulge in both by tweaking the Dark & Stormy cupcake recipe from this month's baby shower. This was followed by a LOT of prosecco and some so-so tapas at 13.5 in Hampden.

(Just a quick note: Egg replacer can seem like a pain to dig up, but any store that carries vegetarian-friendly or gluten-free foods should carry some. I prefer Enger-G myself.)

****************************************************************
Vegan Dark & Stormy Cupcakes
(Adapated from Gosling's Rum)
(NOTE: Go ahead and double the recipe. This version makes approx 8 cupcakes.)

Ingredients:
1 cup flour
1/4 cup sugar
2/3 cup ginger beer
1/4 cup Vegan butter (I used Earth Balance), at room temperature
2 tablespoons dark
rum (Goslings) or 2 teaspoons rum flavoring
1 1/2 tsp egg substitute, or equivalent amount equal to 1 egg
2 teaspoons ground roasted ginger*
1 teaspoon baking powder
1/4 teaspoon salt

Directions:
Preheat the oven to 350. Grease and flour or line 6 wells in a cupcake pan. In a large bowl, cream together vegan butter and sugar until light and fluffy. Add egg substitute, rum, and ginger beer beat well. Add the flour, baking powder and salt. Beat until the batter is light and fluffy. Fold in the ginger. Fill each well 2/3 of the way. Bake approximately 15 minutes or until a toothpick inserted in the middle of the middle cupcake comes out clean. Cool on a wire rack. Frost with dark & stormy frosting and top with a slice of candied ginger.

*McCormick makes it. Look for it in the spice aisle.

I went a little freehand with the frosting. Basically, I took some vegan-friendly vanilla frosting (
Cherrybrook Kitchen makes a good-sized jar), and then doctored it with roasted ginger and about 1/4 cup of rum. Then I added vegan butter and powdered sugar, to make it more of a buttercream frosting.Frost the cupcakes after they've cooled completely. Top with some a light dusting of ground ginger and some pieces of candied ginger. Enjoy!

Tuesday, April 6, 2010

What to do with those post-Easter goodies


Once again I am being a slack blogger, but fear not: I have something to tide you over until my next post.

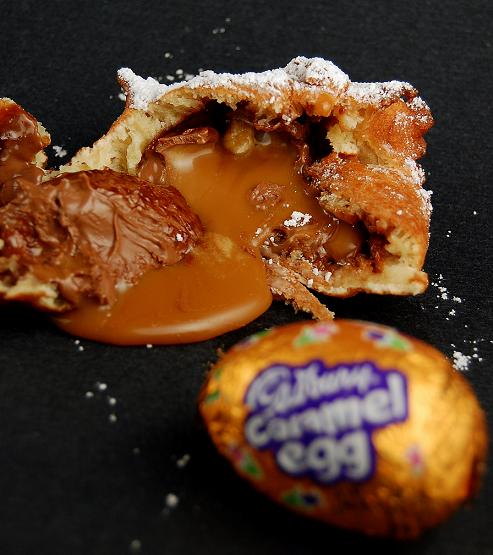
I came across this little number via Tastespotting. While I initially had to suppress my gag reflex, it actually doesn't sound that bad.

...Of course, this is coming from someone who's split a fried Snickers with someone in the past.

Happy belate Holy Zombie Day! Enjoy!!

***********************************************************************

Deep Fried Cadbury Caramel Eggs
(Recipe and Photos courtesy of Culinary Concoctions by Peabody)

6-8 Cadbury Caramel Eggs (frozen)
1 egg
2/3 cup milk
2 TBSP dark brown sugar
1 TBSP Lyle’s Golden Syrup
1 ¼ cup flour
¼ tsp salt
1 tsp baking powder


In a deep skillet, heat about four cups of oil over medium-high heat until hot.
Test the temperature by dropping a pinch of flour into the hot oil. If it sizzles right away without smoking, it’s perfect.

Monday, March 15, 2010

Single Serve Apple Pie: A Quick Post Before the Real Thing

It figures - I go one day without checking up my Google Reader, and I miss out on one of my favorite geek holidays...

March 14 - Pi Day. (Get it? 3.14 - Pi??)

Nerdish tendencies aside, I feel that such delightful wordplay deserves an equally delightful dessert. In this case, Single Serve Apple Pie (baked in a jar) courtesy of Brownies for Dinner.

I'm all about single serve desserts that require minimal prep work. Plus, small food items are just cute. I mean, come on - have you ever seen an ugly petit four?

I promise to update my cooking (lazy man's Pho and Pan Baked Chicken) and dining escapades (dim sum!) later today - in theory. But in the meantime, enjoy your individually portioned deliciousness and while giving thanks for all the irrational numeric joy that is ∏.

*******************************************************************************
Single Serve Apple Pie-in-a-Jar
(courtesy of
Brownie for Dinner and Our Best Bites)

HARDWARE: 4 half pint mason jars

Pie Dough (any 9-in basic dough will do – including store bought- but if you need a basic recipe, check out Our Best Bites’ recipe)

Step 1: Make a topper and line the jar

Roll out a small handful of dough and roll it out to about ¼ inch thickness. Using the opening to one of the jars as a cookie cutter, cut out 4 circles of dough (these will serve as the tops to your pies) and set aside.

Use the rest of the dough to line the jars, taking small portions of the dough and pressing them into the jar. (No, you do not need to grease them) Make sure it's pressed all the way up to the top of the jar, or pretty close to it.

Step 2: Fill your jars with pie-like goodness

You'll need about ½ cup filling for each jar. Any filling will do – canned included. For the sake of this post and as a credit to Our Best Bites general awesomeness, I’ve posted their recipe below:

Basic Pie-in-a-Jar Filling (makes enough for 4 jars)

2 cups prepared fruit (pitted, diced, peeled, etc.)

2 tbsp brown or white sugar (adjust the amount of sugar based on the sweetness of fruit)

2 tbsp flour (more if fruit is particularly wet or moist; less if it's pretty dry)

1 tbsp butter (quartered and divided between the pies)

Seasonings/flavorings- cinnamon, nutmeg, vanilla and almond extract, citrus zest etc)

When your filling is all combined, divide it between the jars and dot a pat of butter on top (about ¼ tbsp)

Step 3: Top it off

Be sure to cut slits into each pie top circle so steam can escape during baking. Place one of the pie dough circles on the jar.

When your topper is ready, slip it onto the top of the pie. It will be large enough that the outside edge goes up the side of the dough-covered jar a bit. Then use your finger or fork to press the 2 pieces of dough together to seal.

Extra tasty option: Brush pie tops with butter and sprinkle with sugar.

Alternative Step 3: Crumb it off

Another option is to do a crumb topping. (Our Best Bites to the rescue, again!)

Crumb Topping (for 4-6 pies)

¼ cup brown sugar

¼ cup flour

2 tbsp oats

¼ tbsp cinnamon

3 tbsp cold butter

Combine sugar, flour and cinnamon. Cut in butter. Add oats and stir to combine.

Step 5: Bake them or Freeze them

FREEZING: When your pies are all done and topped, place metal lids back on and seal them tight. Place pie goodness in the freezer. They should keep for a few months and can placed on a baking sheet and popped directly into a 375˚ F oven for ˚50 -60 minutes. (If you’re worried about putting frozen jars in a hot oven, feel free to let them warm up to room temperature first.)

BAKING: Preheat oven to 375˚ F. Remove the metal lids and place jars directly on a baking sheet. Bake for about 45 minutes, or until the tops are golden brown and the middles are bubbly. If you're baking them fresh and not frozen they take about 45 minutes.

Depending on your filling you can pop them right out of the jar and onto a plate or just eat them right out of the jar.

Enjoy!